

Major Life Update!
It is with extreme excitement that I inform y’all that Adam has closed the chapter on his full time job at a nearby city, and is now able to do what he loves full time - build homes.
We had planned on this happening in the next few years, but everything came together in the last 12-18 months that showed us now was the time. I am a firm believer that opportunities will present themselves when the time is right, and that’s exactly what happened here.


Last year all taught us a number of life lessons, and for our family we realized that the time is now to act on our dreams. Looking back, we should have made this move years ago, but were always worried about one thing or another - and we ended up putting it off until ‘next year’.
Well, there’s no time like the present, and we are all in.
Thank you for your continued support over all these years, we obviously couldn’t be where we are today without such amazing clients, friends, and family.
Stay tuned for A LOT of projects this summer…we have our work cut out for us, and we couldn’t be more excited!
We’ll chat soon,
-Rachael
DIY Gas Pipe Kitchen Shelving
Hi friends!
Today I have a fun DIY for the kitchen, gas pipe shelving! I know the open shelving trend has been around for a while now, and personally my kitchen cabinets are not organized enough to have the contents visible, but I do enjoy the open look. Recently, we installed gas pipe shelving for the kitchen at the farmhouse project (which is allllmost done!) and I took a few quick photos to show you the process, in case anyone else has been thinking of tackling this type of project. Y’all know I am a fan of all things budget friendly, and this project falls right in line with that! Let’s get to it….
PREP:
Honestly, the worst part about working with gas pipe, is taking all the stickers and adhesive off. The pipes are greasy, and I swear they use some extra adhesive to stick the purchase labels on them. For this project, we used the 1/2 inch version of pipe that can be found at any hardware store, and picked up the corresponding wall plates and end caps as well.

After prepping all of the materials, it’s time to measure out and mark the wall. Traditional cabinets sit about 22 inches off of the counter top surface, so that is the height we used for the bottom shelf. A stud finder is a must, as these shelves will carry some weight!
For the top shelf, we just spaced it 12 inches higher, as that is the height I thought looked the best with the remaining wall space available. Each shelf gets two support pipes, and placement of each of the wall plates was marked in pencil on the corresponding stud.
INSTALL:
The next step is attaching the wall plates to the studs, and while the plates have four holes for screws to attach them, we have found it is best to use only two at this step since there is usually some amount of adjustment later on. The below picture is an example, as well as a photo of the type of screws that we use.


Once the wall plates are installed, it’s time to attach the gas pipe and end caps. This step is fairly straightforward, except make sure to not over-tighten the pipe to the wall plate.
Now it is time to level up the shelving, so the wood pieces lay flat and dishes don’t lean or fall. For this shelving we used a 6 foot level, but you can use whatever size works for your project. I would say the most tedious part of installing this type of shelving, is making sure they are level. Some wall plates will need to be adjusted by tightening or loosening the screws, or even moving them a quarter of an inch or so. I tend to be very particular for kitchen shelving, and less with shelving for other purposes, but it is up to your personal preference. Either way this step is not difficult, just a bit time consuming.

Once all of the shelves are level, this is the time to add in the additional screws to the wall plates, if that is your preference.
The final step is adding the wood pieces to span the gas pipes, and complete the shelving. Another quick check of the level, and you are all done! Here is a picture of how this project turned out.

We chose open shelving for the kitchen at the farmhouse project mostly due to the fact the kitchen is pretty small, and would look pretty cluttered with full upper and lower cabinets. There is still plenty of enclosed storage, for all those appliances or bulky items.
We have a different style of gas pipe shelving in our personal home, which is used to display my collection of vintage glass bottles. Overall, the process is the same.
Here is a photo of the other style:

I just want to wrap up this post thanking each of you for being here and supporting us! I feel like 2020 has really thrown everyone’s plans for a whirlwind and we just have to learn to keep adapting to the changes and challenges presented to us (sometimes daily).
Also, I have been really itching to get back into the DIY’s lately (I feel we got away from them a bit over the last year) so feel free to shoot me a message or comment if you have something specific you have been looking for. I hope everyone is doing well, and I will chat with you again soon!
Cheers!
Rachael
Book Shop Back Open!
You read that correctly!
My hand stamped book shop is back open on Etsy, following an extensive closure due to a shortage of materials related to COVID-19. These vintage-inspired book sets are stamped and personalized by me, and make a great gift for any occasion. Here are a few photos…


I purchase these books from second-hand stores, so they all sit in my garage for 24 hours before I do anything with them, please allow an additional day for processing for this reason. Also, if you are local, shoot me a message or email prior to your purchase so I can set up a pickup and avoid shipping charges.
I hope everyone is staying safe and healthy, and I will chat with you soon!
-Rachael
Farmhouse Renovation: Month 5
If you are new here, we are in the process of renovating a c.1900 Iowa farmhouse that we purchased about 5 months ago, and to be honest I thought we would be pretty much done with this project by May 1st. Well, as you all know, a world-wide pandemic came along and threw everyone’s plans for 2020 out the window.
I was torn on even writing this update, I mean there are much more important things you could be reading right now. Ultimately I decided to proceed, to try and provide a sense of normalcy for myself and maybe a 5 minute break from reality for my readers.
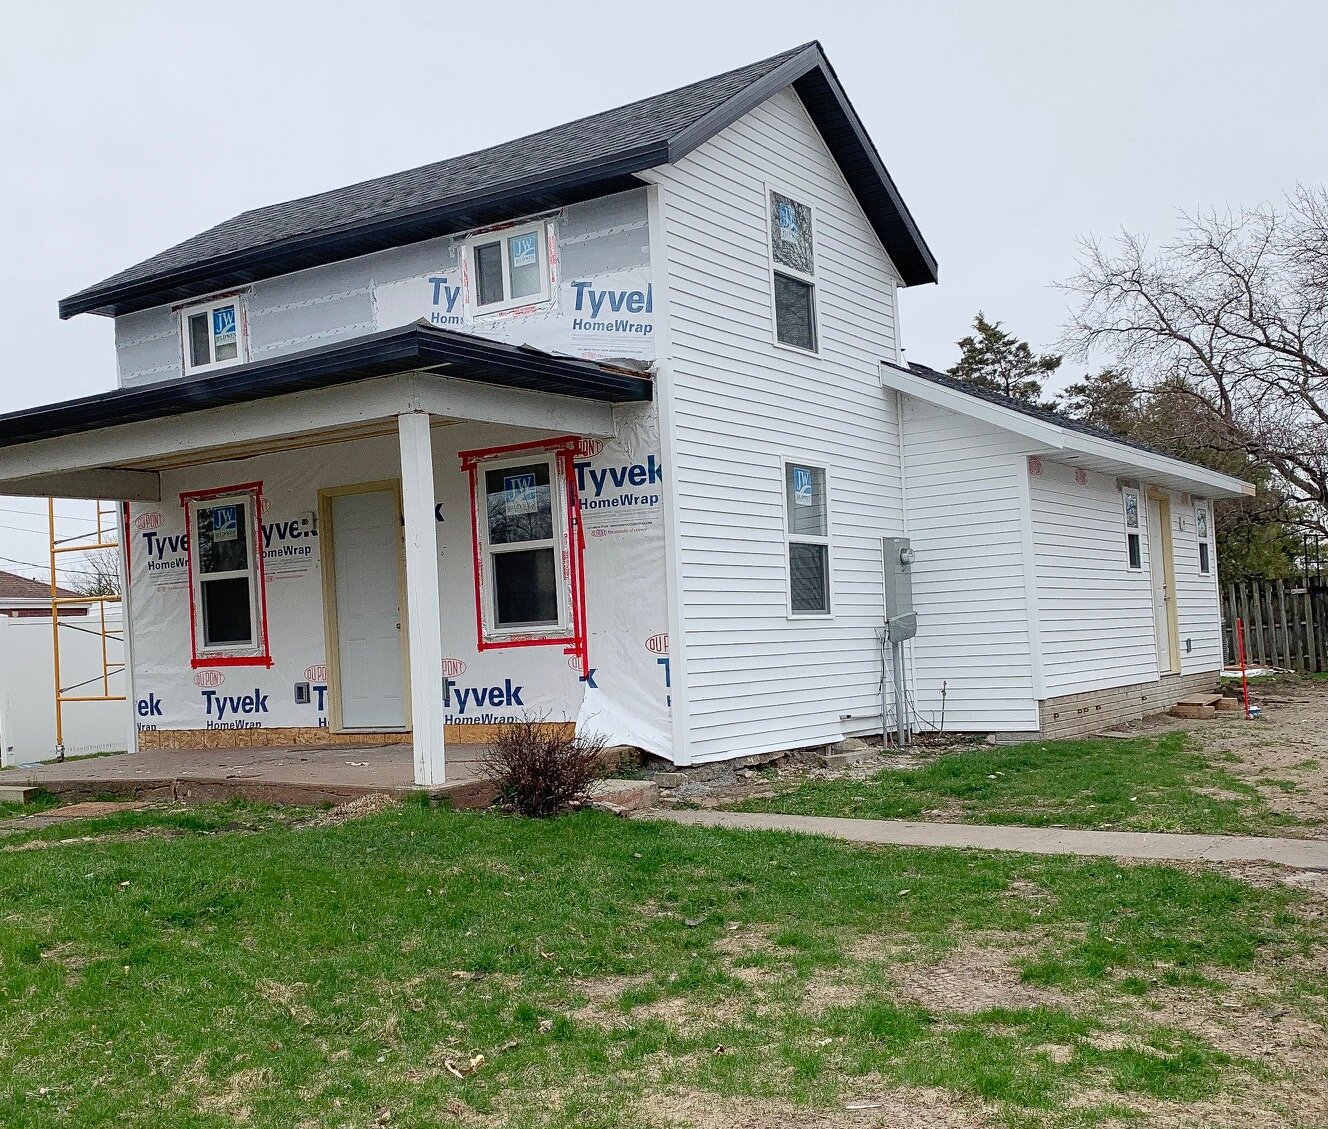
Over the last month, we have made huge progress on the outside of the house, installing new siding, sofitt and fascia. You will notice the black sofitt (overhang of the roof) on the old section of the house, and white on the new section. We also have white vertical siding for the front of the home, which is actually going up tomorrow, weather permitting. Here is a close up photo of the sofitt, so you can see the difference.
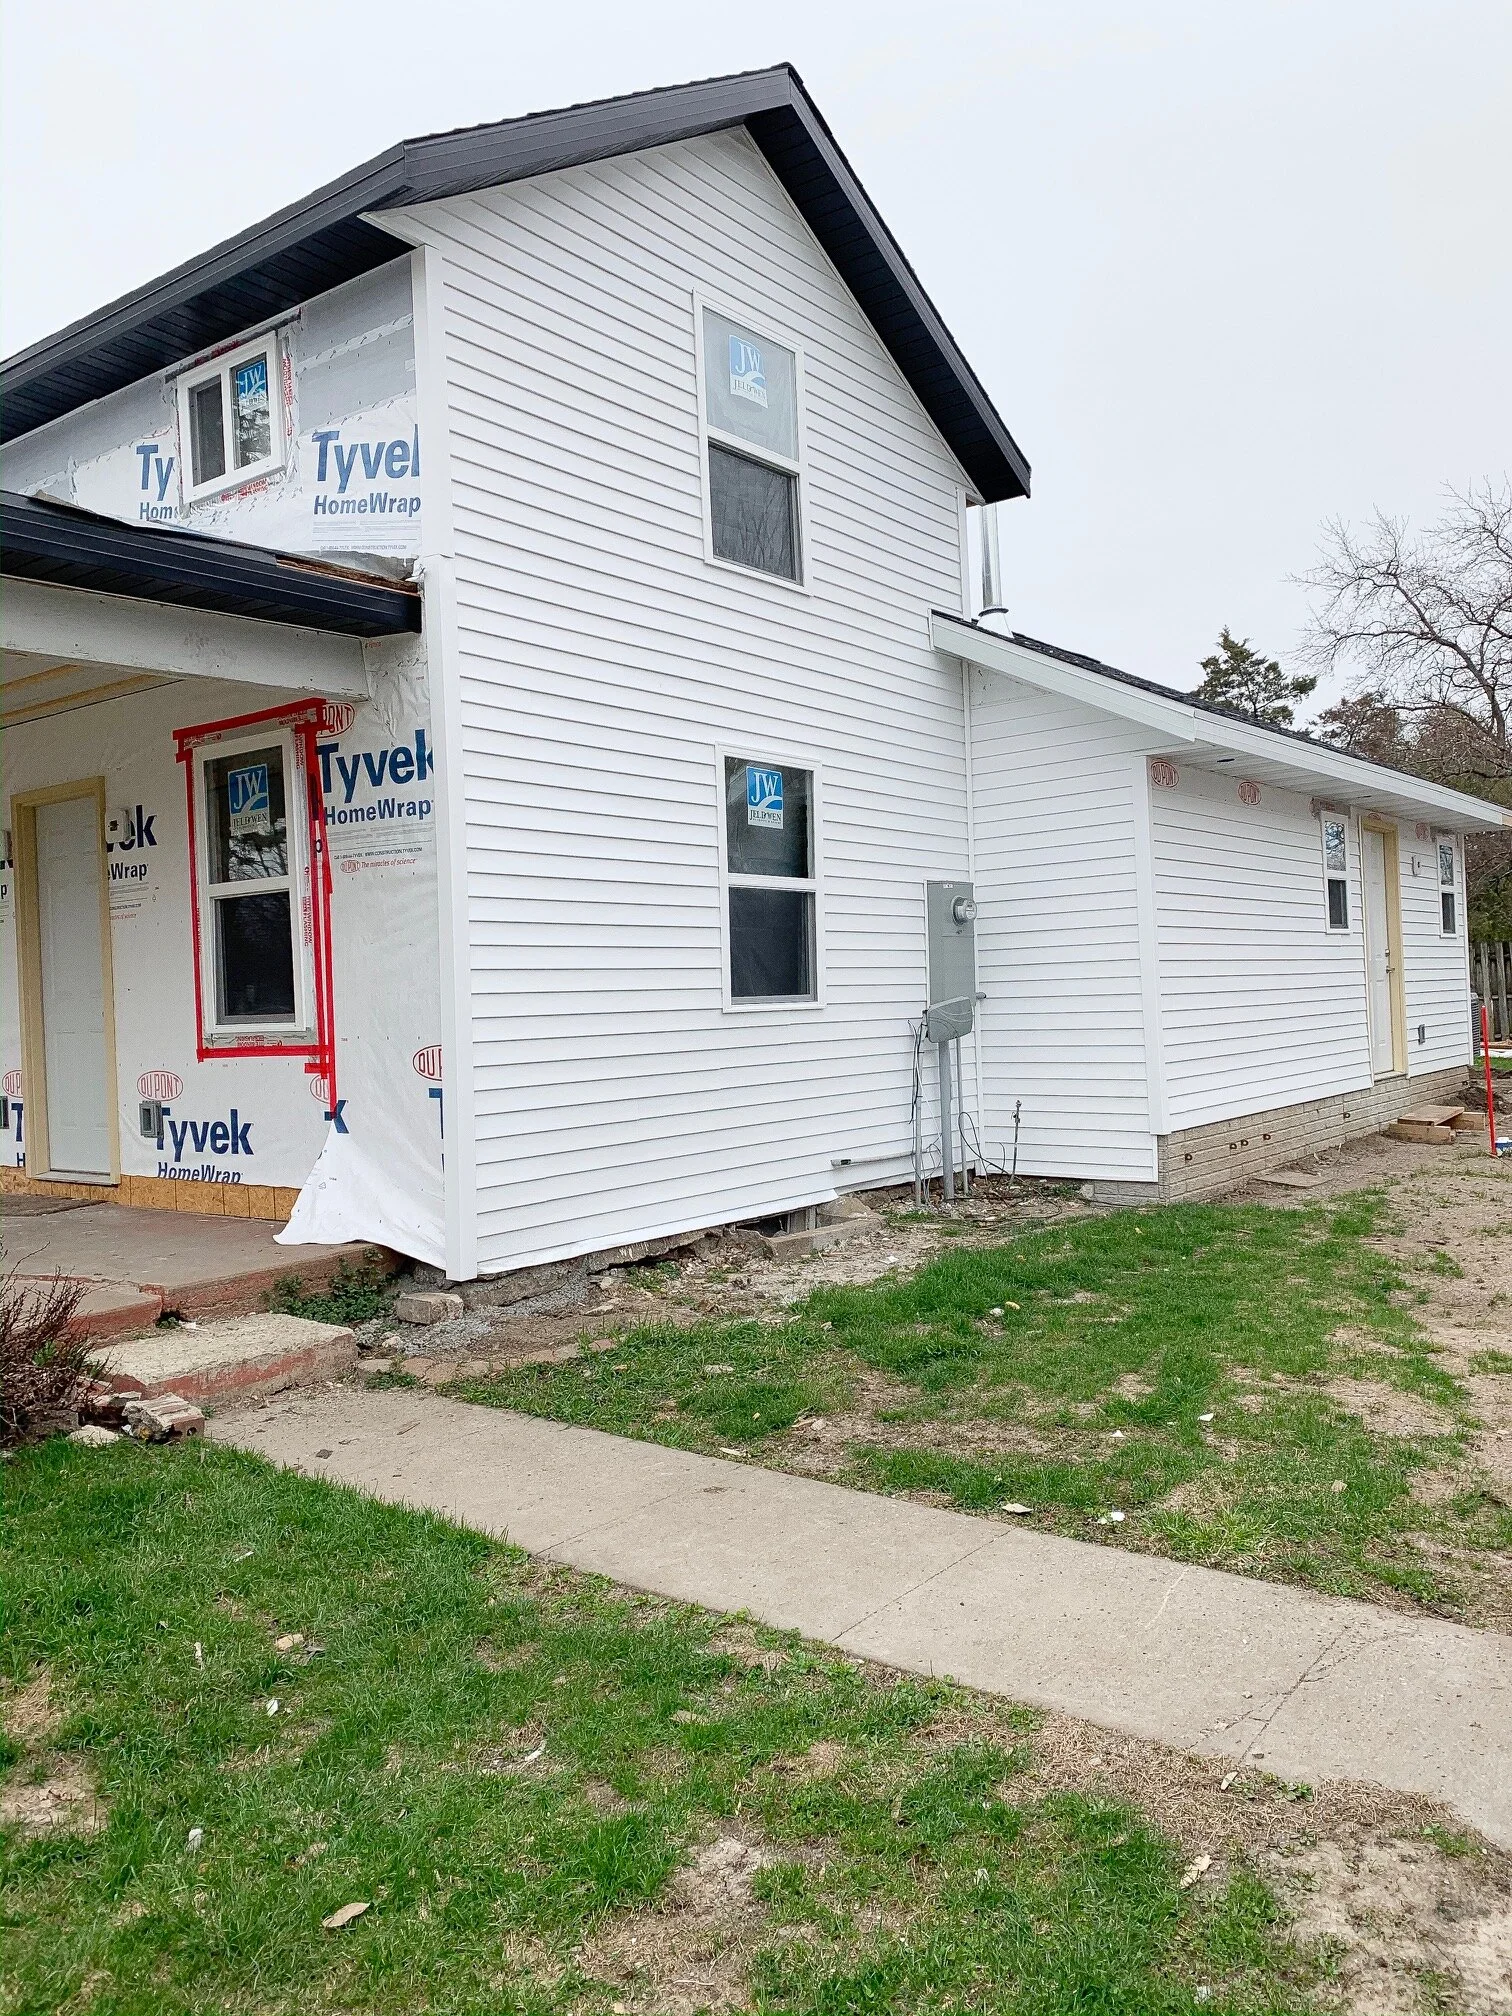
I really wanted to do something different for the original section of the home, to make it stand out, and I think the contrast of the black sofitt is exactly what was needed. I really wanted to install vertical siding on the entire house, but it’s so much more expensive than horizontal, and wasn’t really in the budget. Either way, the home will look amazing with an all new exterior.
In fact, I dug up an old photo of the house that we took right after we bought it and I will add it below for comparison. There’s quite a difference from a few months ago!

This was taken right after we closed on the house!
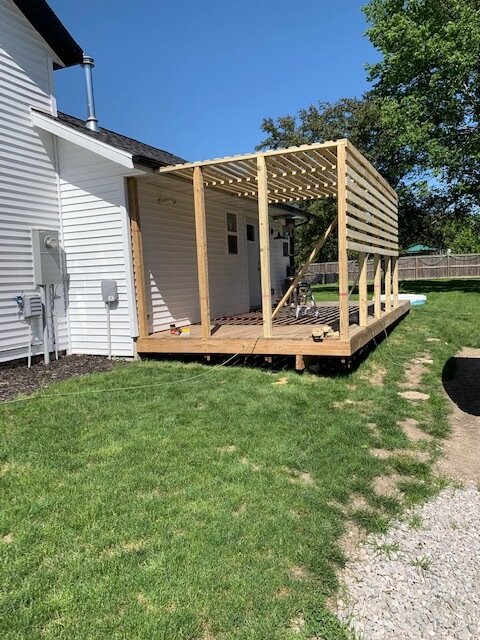
With the completion of the vertical siding on the front of the house this week, all that remains for exterior work is the front decking and posts. And of course some landscaping, but this is Iowa so we can’t do much of that until late May. Maybe some flower shops will be open by then!
Well that is all i have for this update. Again, thank you for taking time out of your day to stop by the blog, we really appreciate seeing all of your support. Wherever you are in the world, I hope you are staying safe and healthy.
Until next time,
Rachael
Farmhouse Renovation: Month 3 Update
It’s time for another update on the farmhouse renovation project!
For anyone new here, we purchased a c.1900 Iowa farmhouse 3 months ago and promptly tore down a large (sagging) section and have been putting it back together ever since. This has definitely been an interesting project, mainly due to there not really being any building codes or rules to follow 120 years ago, so we have had to allow for extra time (and money) to accommodate unforeseen things along the way….(hello super scary/non supported second floor…i’m looking at you!)
Enough on the recap, let’s get on to the accomplishments for the month….
New this month:
-All Plumbing
-Furnace and all duct work
-Interior walls framed up
-All windows replaced
-Almost all the siding torn off original structure, and new OSB and tyvek paper
-All electrical wired up and ready
-A functioning set of stairs
Here are a couple photos showing the updates…

This photo is from the front porch, looking at the front door

The porch view after new walls and windows!
The above photos show just how extensive this renovation has become. Was it in the original plan to tear everything out to the studs? No. However, we needed to replace the improperly installed windows and that meant tearing off all the siding out front. The insulation and sheeting weren’t up to par and not really functioning, so they all had to go too.
Now, this means more work and increased cost, but we would rather spend a few more dollars up front and not have to worry about issues down the road. Plus, this is Iowa so we can’t have poor insulation and improperly installed windows or utility bills will be very high.


We have repeated this same process, section by section, for the entire house. Only one small part remains, and that will be done shortly. It’s particularly time consuming to do this all in January, but that’s what we have to work with at the moment. I mean, icy scaffolding just makes things more interesting…right?
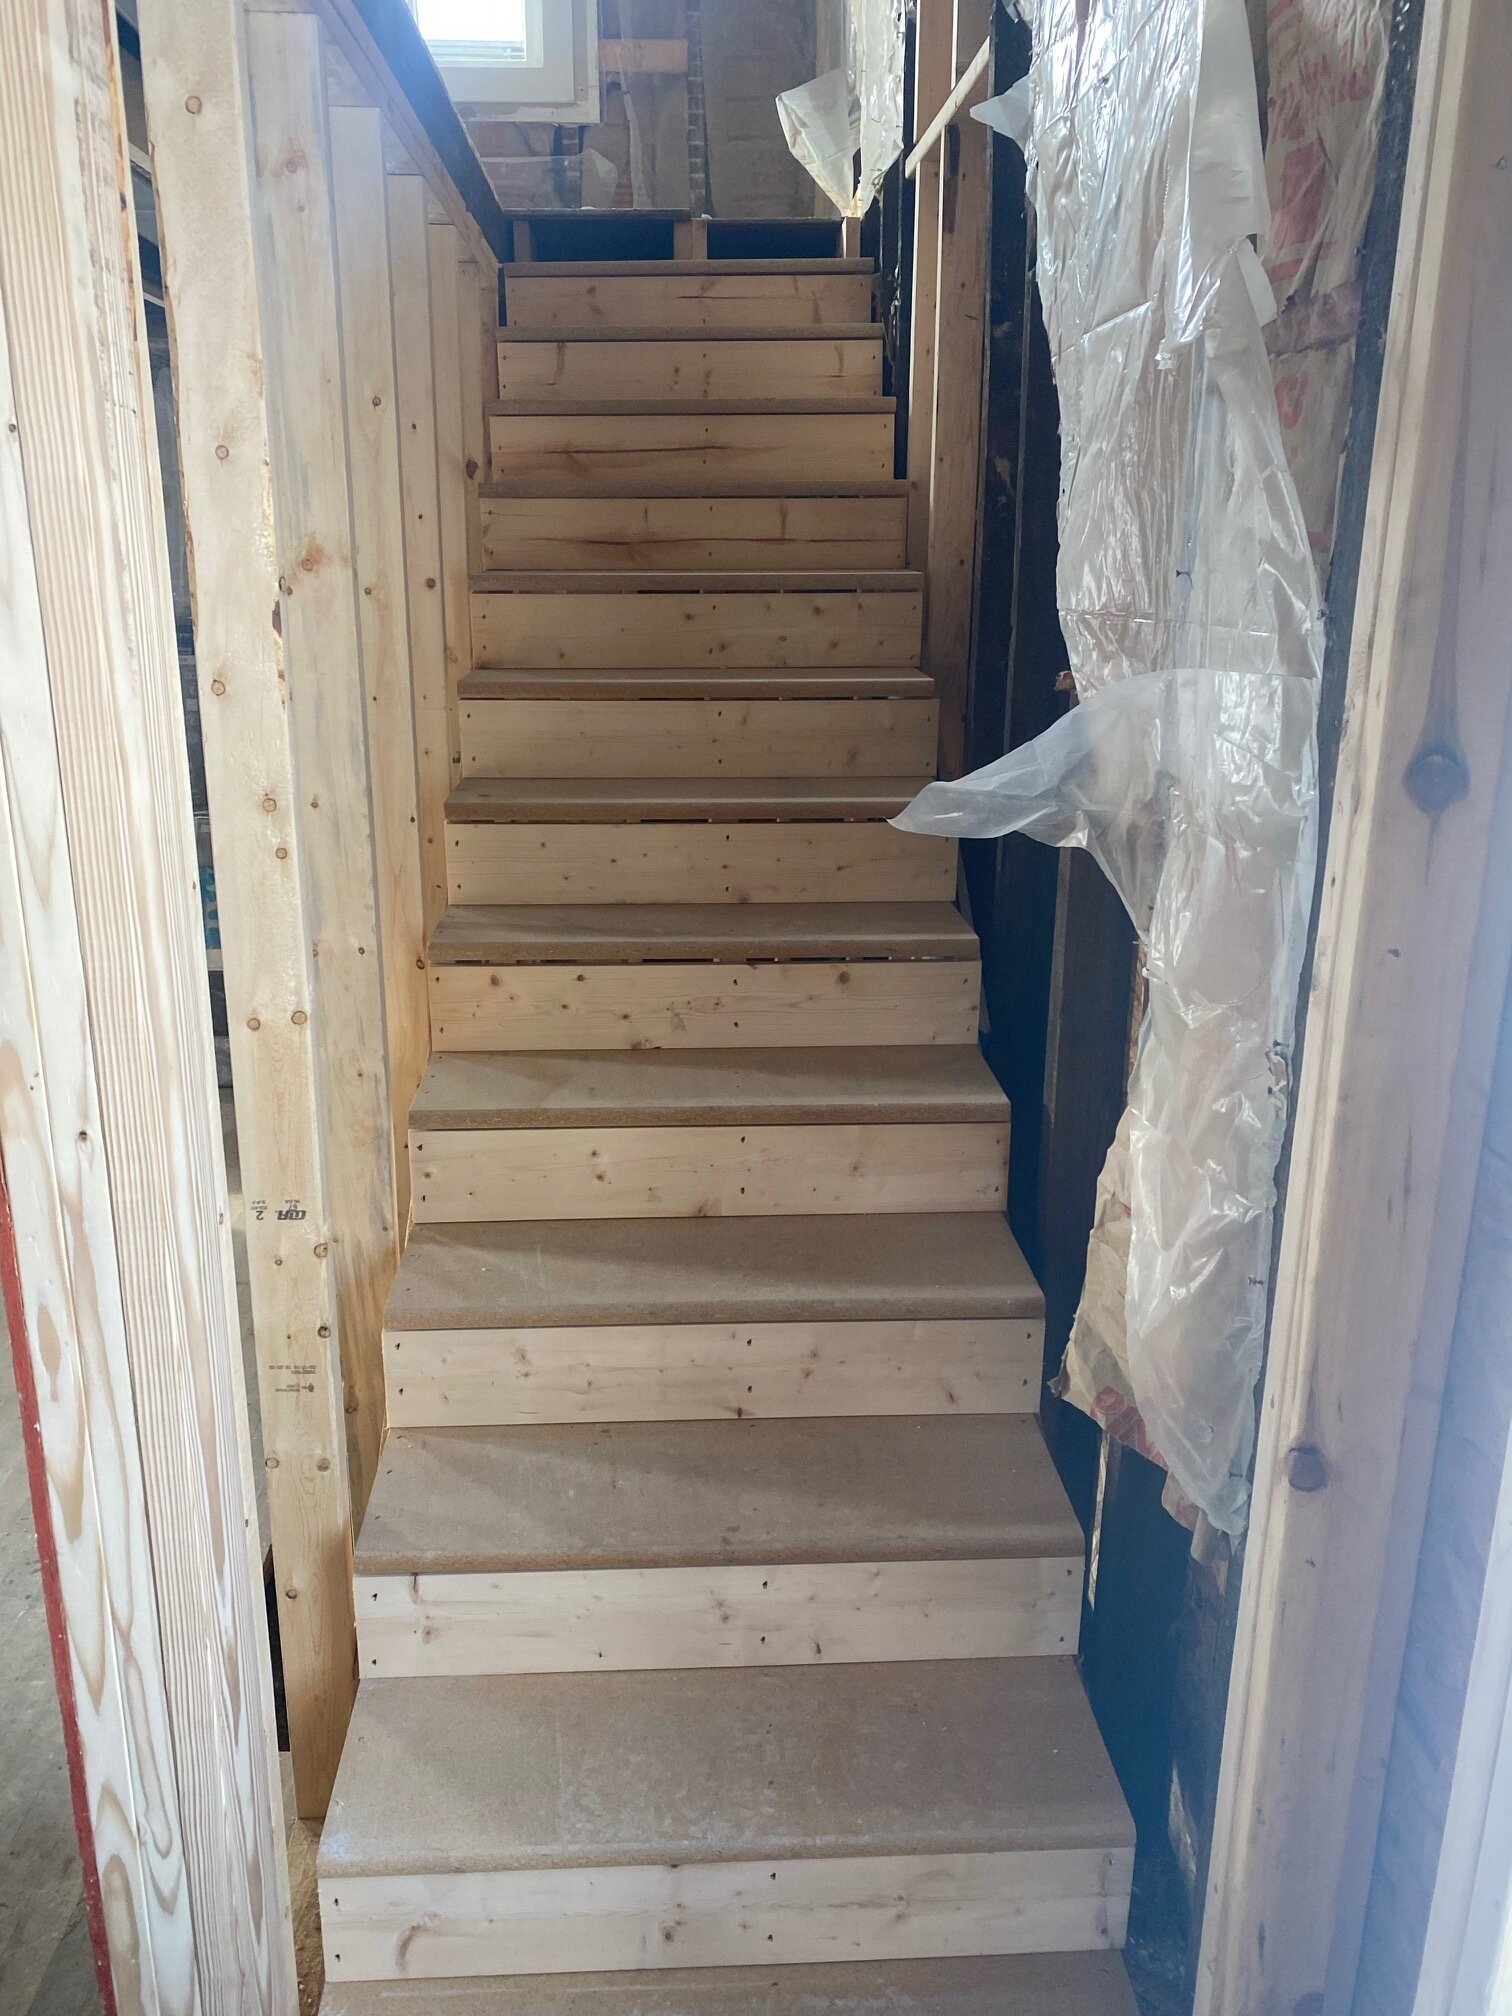

Next up, we have a fully functional and standard size flight of stairs to the second floor. Gone are the days of ducking your head and climbing super small and steep steps with no railing.
Speaking of the second level, we haven’t been up there for several weeks while there were no stairs, and I lost track of how much we have to do up there as well. Obviously the windows will have to be replaced (might as well do them all, right?) but the flooring and fixtures will need work too.
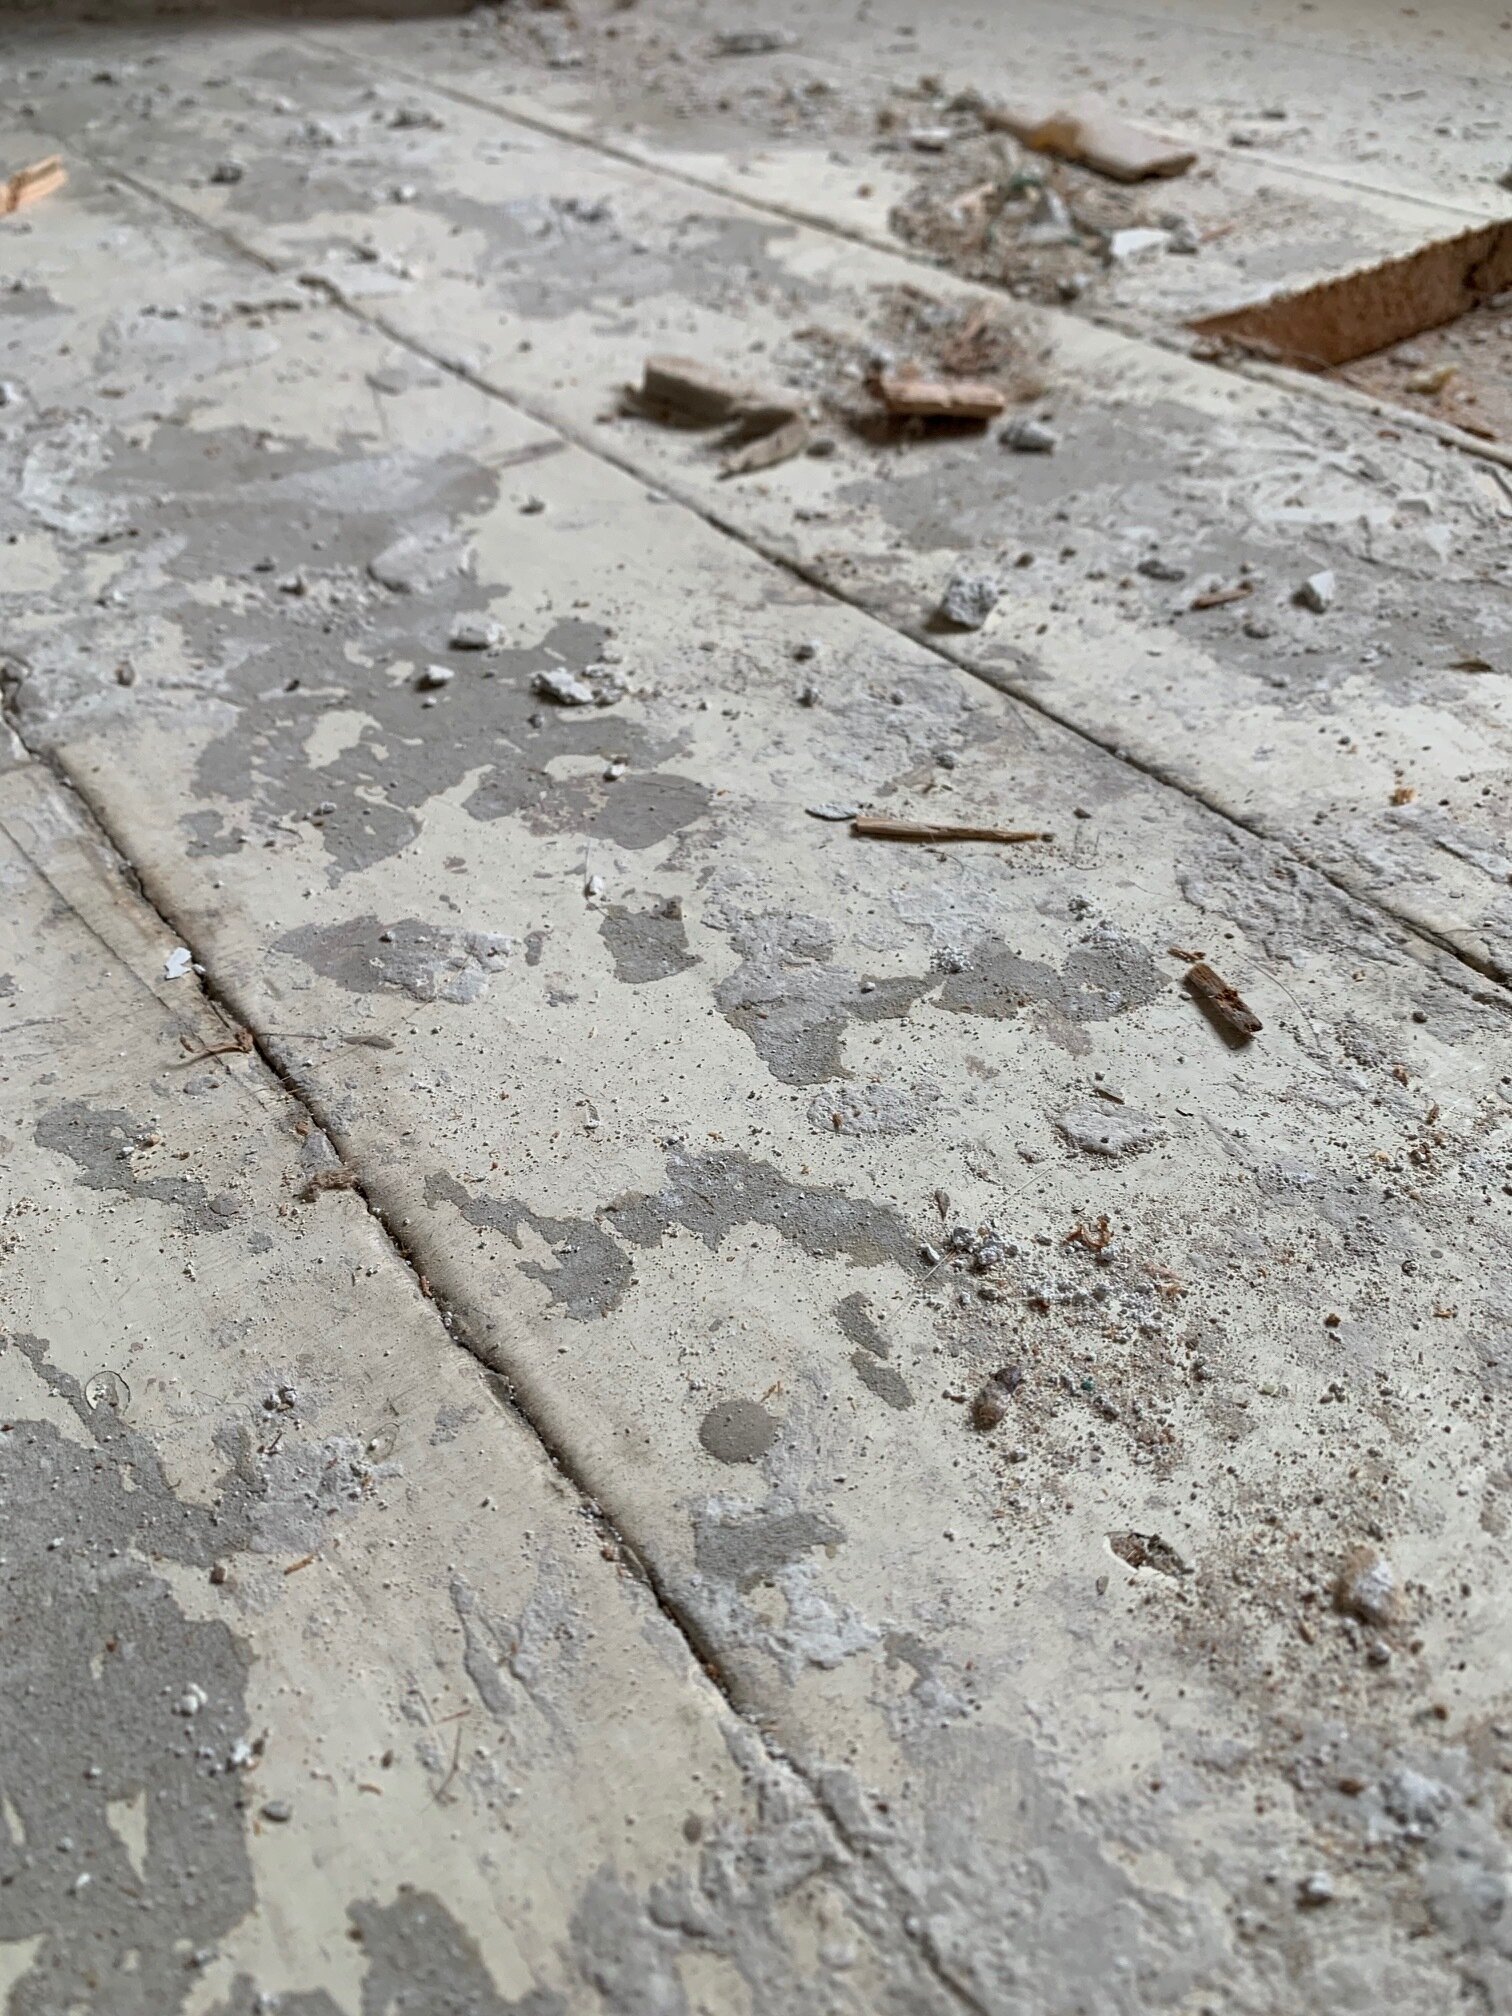

The first photo is of the (likely lead) painted original flooring, and we simply cannot sand that down and use it, for obvious reasons.
The next photo is a view from the stairs, and while things might not look too bad up here there is still a bunch of work to do. For example, the door to the second bedroom no longer closes due to the bracing and raising of the floor that was required in order to ensure it would not come down. We also need proper safety mechanisms such as smoke detectors, railings, and windows that are the required size, in case of emergency evacuation. These things can all be done now, since we can now access this part of the house!
As always, our daughter (who we call ‘the inspector’) is as involved as a two year old can be, and she loves to ‘help’. The weather in January has made this somewhat difficult but we work with it the best we can.

Helping dad with the front door

Giving her approval of the new stairs
That’s all I have for this update! I will leave you with a fun little before and after of the outside. As always, thank you for visiting the blog today, we really appreciate all of your support!
Cheers!
-Rachael


The Boathouse Project
We are in Summer’s home stretch, and the Iowa heat and humidity have certainly been oppressive at times! That, combined with a tornado, made this outdoor client project particularly challenging, so we were really excited to finish it last week. Here are some of the pictures and details of “The Boathouse”.

The details:
-14ft by 26 ft building
-364 sq feet
-10ft 2x4 walls with active dormer
-200 amp electrical service
-8/12 pitch roof with asphalt shingles
We have had several comments that this building looks like it could be a tiny home, and plumbing aside it really could be! The poured concrete walls and polished floors make this building bug and critter free…not just your typical back yard shed! Here’s a peek inside at all the lofted space.
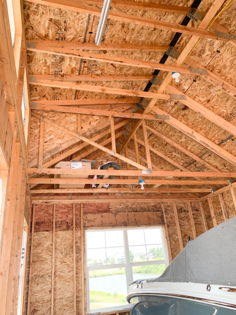
The 10 foot walls provide a lot of extra space for storage racks or shelving in the future. And the 9 ft tall garage door helps with backing in a large boat full of lake accessories. For the below picture, keep in mind that Adam is 6ft 4in tall!

We have a couple more outdoor client projects lined up for the late Summer/early Fall, however they are not as labor intensive as this was. It’s always exciting to see a project come together, and this one was no exception! For now, we are on to the next as we need to squeeze out every last day of Summer that we can…( Maybe someday I could have something similar to this boathouse as my very own she shed! A girl can dream! haha).
Unitl next time friends!
Rachael & Adam
Collaboration with Glyn-Mawr Winery
Today is the day! I can finally reveal my latest project, and I am so very excited!
Recently, I had a local business reach out and request some of my personalized book sets for their winery and tasting room that has a small merchandise area stocked with items from nearby artisans. Prior to this meeting I had never been to Glyn-Mawr Winery or their tasting room/storefront ‘the local’, but I quickly fell in love with their farmhouse and country style decor (and might have picked up something for my laundry room remodel). I snapped a few quick photos, and you will see what I’m talking about!


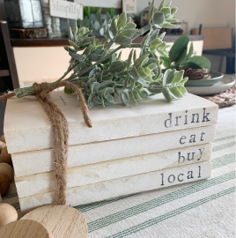
Here are a couple examples of the book sets I made for their shop…

The entire town has a 4th of July antique festival, full of vendors and food trucks and the like, and if you are local to eastern Iowa it’s definitely worth the drive. Weather permitting, I will be there myself tomorrow, so feel free to stop by and say hello!
Thank you for stopping by the blog today, and have a safe 4th of July!

My (No-Cost) Holiday Front Porch!
Last week I wrapped up my decorating for the year by completing my front porch, and it was a challenge! If you follow me on Instagram (@aps_design) you already know that I posted the whole process on stories that day, attempting to do the entire porch with items I already had at home, no purchases!
This was a personal challenge I came up with because I know I have a ton of items at home that I should be creative with and use for decorating, but I usually forget to do that and just purchase what I need instead. But, in the spirit of budget friendly, I went with a no-cost front porch this year! Now I will admit, I have a large collection of random items that helped make this task possible, but I did have to get creative in using them and some of these methods could inspire you as well!
Lets get to it!
I worked on the right side of the porch first, collecting items and putting them in a wagon that I found in my garage. I had made some ‘presents’ out of blocks of wood earlier this season and decided they would go well together in the wagon. The crock that is also in the wagon could probably use some greenery but in the spirit of not buying anything for this porch decor, it remains empty.
The large rusted milk jug is a staple piece for my front steps, so it always stays out there in some capacity. This season I gave it some height by positioning it on top of an overturned wooden apple box.
I piled the wood slices up in front of the wagon to add more of a woodsy/rustic/tree farm feel to the picture.

The left side of my porch was a bit more challenging, as I did not have any Christmas lights on green wire, but in the evening hours when the tree is lit it’s not as noticeable. I simply put the tree in an old wash bin and stacked some wood slices in front of it.
During my scavenger hunt in the garage, I found this beautiful vintage sled and half barn door that I had previously forgotten about. I grabbed a little greenery and tied it to the sled. Ideally, I would find some old ice skates to pair with the sled, if I wasn’t doing a no-cost challenge!


Here’s the final look!
Again, I would have done things a little bit differently if I wasn’t doing this little personal challenge of not purchasing anything for the front porch, but this did force me to look through things I already had and be creative in using them. I hope this can provide some inspiration with your own budget friendly decorating! Merry Christmas!

My Entryway Sawhorse Table
Hi Friends! I’m slowly getting my home ready to go for Christmas, and I love decorating this fun sawhorse table in my entryway each and every season. My husband made it several years ago, and it continues to be a focal point in our home. I thought I would share what I did with it this year so you can get some ideas or inspiration for your own home!
I had these random steel buckets from a thrift store, a DIY Christmas garland that I made, and some jingle bells and other random items that I wanted to incorporate.

I love this old spool and jingle bells!

DIY Fabric Garland, click for instructions!
Here is how it all turned out, I love all of the different textures (metal, fabric, etc) along with the black and white and plaid holiday colors. Can you tell I am loving buffalo check this year??

My Saw Horse Entryway Table
Repurposing old items is one of my favorite decorating hacks! These hooks that hold up the lanterns on either side of the table are from an old carriage house/barn that had to be torn down due to storm damage. Just think of all of the horse and carriage equipment that hung on these hooks for decades, now they are continuing their work in my home! (I’m a history nerd, I know!)
Well that is all I have for you for now, stay tuned for the rest of my décor in my personal home as I get it completed!
XO,
Rachael
PS. I put together a simple (budget friendly!) guide to adding buffalo check to your home’s décor, and if you are stumped or need ideas feel free to check it out by clicking here!
(Note: The above link contains affiliate links and you can read my full disclosure here)