
My (No-Cost) Entryway Table Decor
Hi all! I have (quite unexpectedly) found myself in the middle of a January heat wave here in Iowa, and that has brought about inspiration to purge all things winter, clean, and organize. Now depending on where you are from, you might not think 50 degrees is a heat wave, but to an Iowan this kind of weather calls for opening windows and doing some spring cleaning!
Now if you follow me on Instagram, you know that recently I tackled the large entryway table to my home and cleared all Christmas decor and started fresh. This table has always been challenging to decorate, partially because it is so large and also due to the rest of my entryway being so bare, making it the focal point for all visitors.
Also, being that I was in a cleaning and purging mood, I didn’t want to have to leave and purchase any decor items and interrupt my motivation so I decided to style the table with only items I had on hand. If you have been following along for a bit you might remember that I took this same ‘no-cost’ approach to my front porch this holiday season and that blog post received the highest traffic of any that I have written, so I know you all enjoy my re-purposing and budget friendly take on decorating! If you missed that post, I will link it here.
OK, let’s get to it!
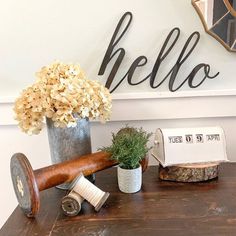
I tackled this large table in sections, pictured below is the right hand side of the table.

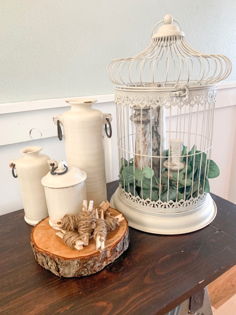
Here we have a vintage birdcage that we used as a card holder at our wedding, as well as an old spool (from a friend’s basement clean out), a tray of pine combs, and some twine. Easy!
Up above the birdcage, and on both sides of the table, I have these copper lanterns I purchased years ago at Hobby Lobby, and they are both hanging on iron hooks that were in an old carriage house that we tore down after it sustained wind damage beyond repair. These hooks held the bridles and other equipment for the horses that resided in the barn. You can see an up close picture below.

Next up, the left side of the table!

This end has quite a collection of miscellaneous items! I have absolutely no idea where the basket is from, I have had it for so many years. I filled it with a metal canister I previously picked up at a thrift store, a distressed mason jar that I made, some wood slices and a wooden sign that I had laying around.
Now for the finishing touches and final picture!

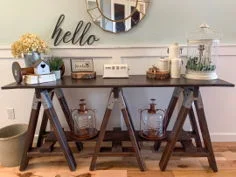
Here is the finished table! In the middle I added some additional wooden signs, a small bit of greenery, an old re-purposed shutter and a metal ‘hello’ sign (it’s an entryway after all!).
This metal sign I picked up at JDH Iron Designs down in Waco, Texas when I was there almost two years ago to see the Magnolia Market. If you followed along on the HGTV show Fixer Upper, you might remember that Jimmy Don and JDH Iron Designs made all of the metal signs that were featured in the market and in the finished homes. My sign is even autographed by Jimmy Don! If you ever make it down to Waco I highly recommend visiting his shop. (Not a sponsored post, I just really like his work!)
The actual sawhorse table was built by Adam and APS Construction, I think it might have been the very first piece of furniture he made.
Well, I’m off to take advantage of this warm weather and tackle a few more things outdoors before it returns to January around here! I hope this post has provided you some inspiration for decorating your own home and I will see you guys soon!

My Entryway Sawhorse Table
Hi Friends! I’m slowly getting my home ready to go for Christmas, and I love decorating this fun sawhorse table in my entryway each and every season. My husband made it several years ago, and it continues to be a focal point in our home. I thought I would share what I did with it this year so you can get some ideas or inspiration for your own home!
I had these random steel buckets from a thrift store, a DIY Christmas garland that I made, and some jingle bells and other random items that I wanted to incorporate.

I love this old spool and jingle bells!

DIY Fabric Garland, click for instructions!
Here is how it all turned out, I love all of the different textures (metal, fabric, etc) along with the black and white and plaid holiday colors. Can you tell I am loving buffalo check this year??

My Saw Horse Entryway Table
Repurposing old items is one of my favorite decorating hacks! These hooks that hold up the lanterns on either side of the table are from an old carriage house/barn that had to be torn down due to storm damage. Just think of all of the horse and carriage equipment that hung on these hooks for decades, now they are continuing their work in my home! (I’m a history nerd, I know!)
Well that is all I have for you for now, stay tuned for the rest of my décor in my personal home as I get it completed!
XO,
Rachael
PS. I put together a simple (budget friendly!) guide to adding buffalo check to your home’s décor, and if you are stumped or need ideas feel free to check it out by clicking here!
(Note: The above link contains affiliate links and you can read my full disclosure here)